In this post I go through the steps of item receive with the standard build in Mobile device functionality of Dynamics 365 F&O. This post is not about direct delivery, which I will explain in a next post. I go through the steps,of the the process to receive items from a Receipt location where they are transferred to a Put location. Here are the steps:
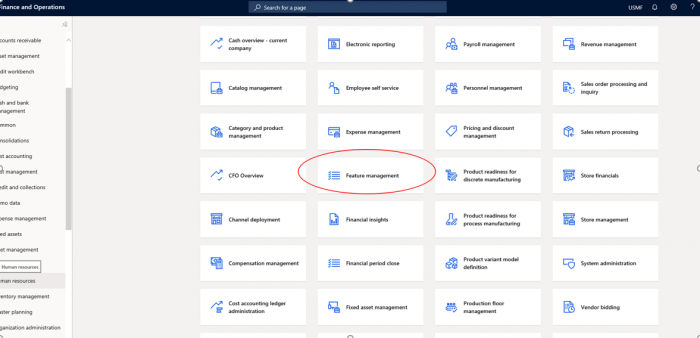
1. Check if Feature management is enabled. In Modules select System administration | workspaces and open Feature management, or select the Feature management icon in the main menu.
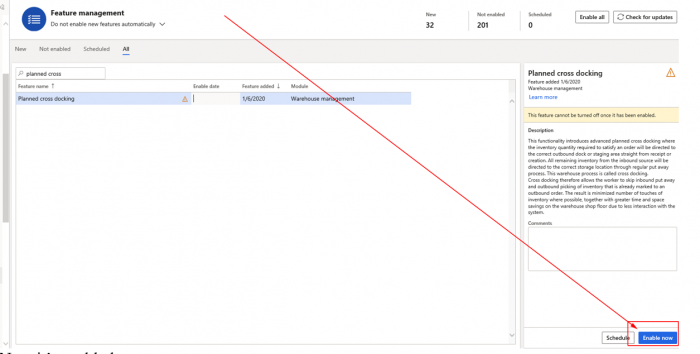
2. Search for planned cross docking in the filter and check if it is enabled. Click ‘Enabled’ button if not enabled yet.
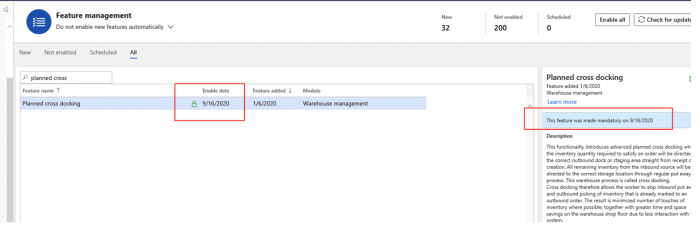
Now it’s enabled:
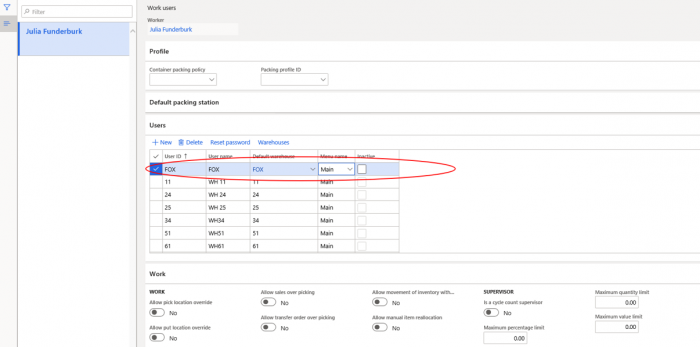
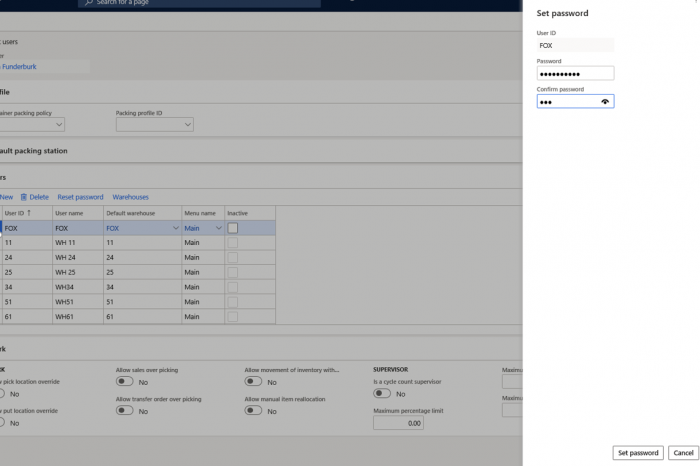
3) We can create our own worker, or reset password from existing workers for login. In the example I add user ID Fox and choose the same password. See Warehouse Management | Setup | Worker
Set the password:
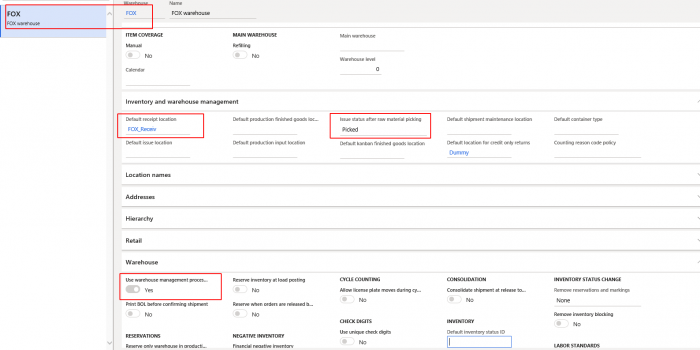
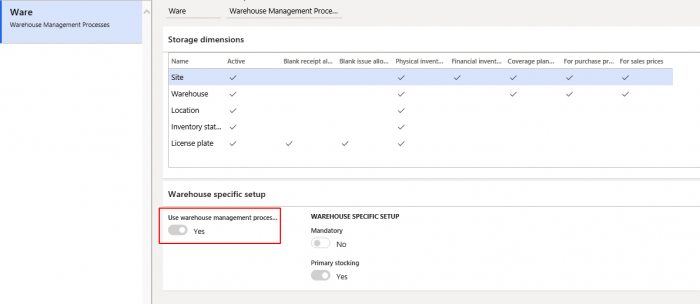
4A). I created Warehouse FOX. We can find warehouses at: Warehouse management | Setup | Warehouse -> Warehouses. In order to use Warehouse FOX for advance warehousing which is necessary, The property Use Warehouse management process must be ticket. In the screenshot an example. We have to enter the Default receipt location. We have to enter a status in the Issue status after raw material picking. For configuration Pick location see step 5D) Location directives
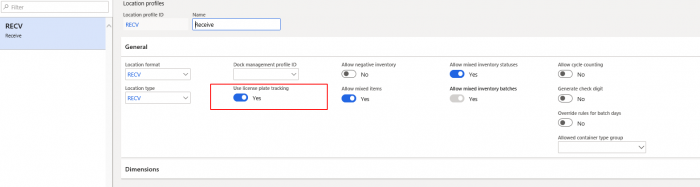
4B) To avoid error “Default receive location must be set on the warehouse and be license plate controlled”, we have check if the license plate tracking is enabled for the location:
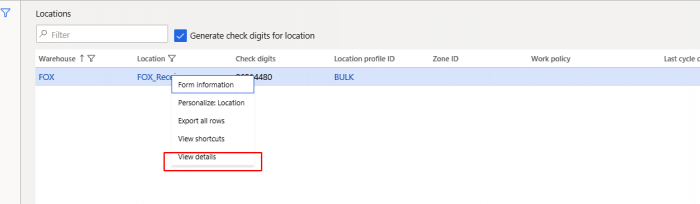
Check the view details of the Location profile ID.
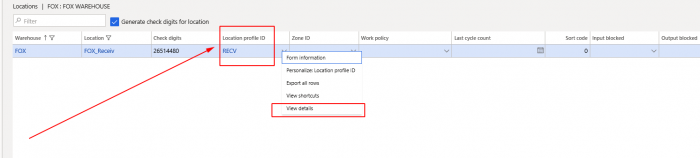
Check field Use license plate tracking is set to Yes.
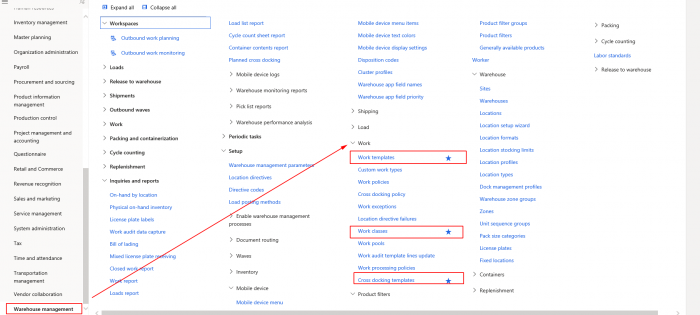
5. Related to work the following configuration needs to be done:
A) Cross docking template (Warehouse management | setup | Work | Cross docking template)
B) Work class (Warehouse management | setup | work | Work classes)
C) Work templates (Warehouse management | setup | Work templates)
D) Location Directive (Warehouse management | setup | Location directives)
E) Mobile device menu items (Warehouse management | Setup | Mobile device menu items)
Work Template – Work Templates are a tool that warehouse management uses to create work at various points in the system. For example purchase order has been received, so a work item must be created for somebody to go and pick items from the defaulted receiving dock and follow the location directive action to put them away in bulk location.
Work classes: Allows for quality putaway work to be driven to mobile device menu items other than those used for receiving.
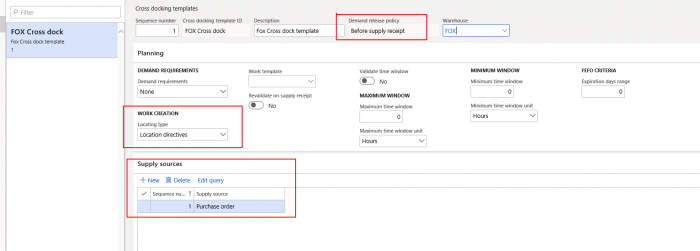
5A) We create a Cross docking template for warehouse FOX. Check the value Demand release policy is set as “Before supply receipt” (the other option “At supply receipt” is used for Production orders). Warehouse is set FOX. Demand requirement is None, location type is Location directives. For Supply source we select Purchase order.
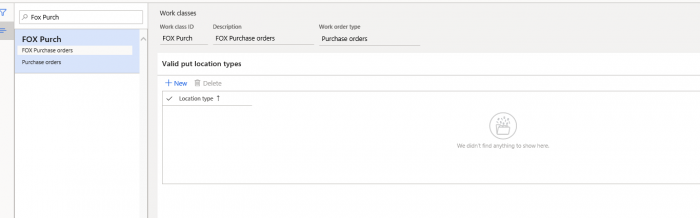
5B) Create a Workclass. Example as shown in screenshot below:
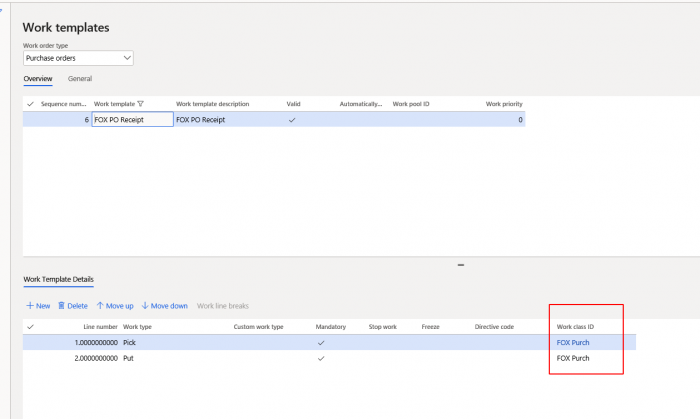
5C) Work templates. Set Work order type Filter to “Purchase orders”. Then create the new record in the Overview section. In the Work template Details section of the screen, we add Work type Pick and Put. For both lines we assigned the workclass created in previous step 5B)
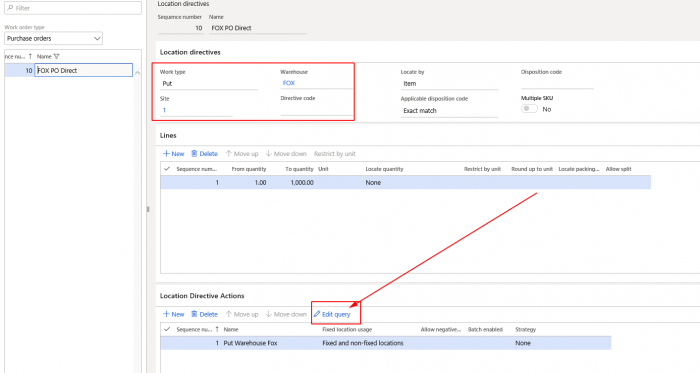
5D) Location Directive can be found at: Warehouse management | setup | location directives.
Location directives are used to direct work transactions to the appropiate location in the warehouse, like the Put location for which we doing the setup. Filter Work order type by “Purchase Orders”. We start create new record in Lines section. Work type is Put and Site is 1 and warehouse FOX. Then fill in Lines and Location Directive Actions section example as displayed in screenshot below.
To configure Put location, click Edit Query in the Location Directive Actions section.
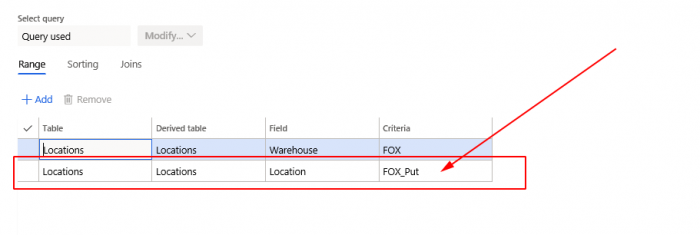
Select the appropriate Location for field Location as Criteria:
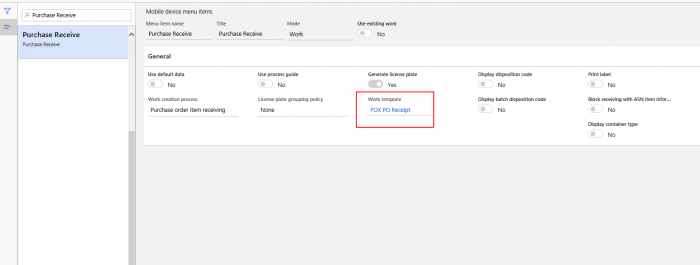
5E) Mobile device menu items can be found at: Warehouse management | setup | Mobile device menu items:
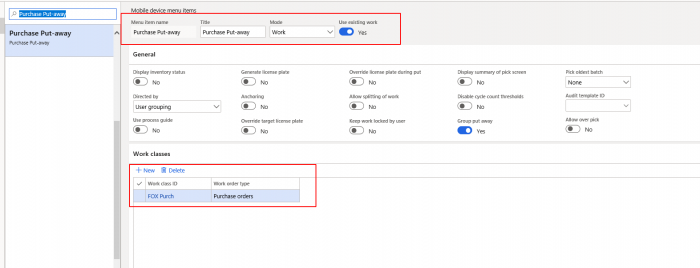
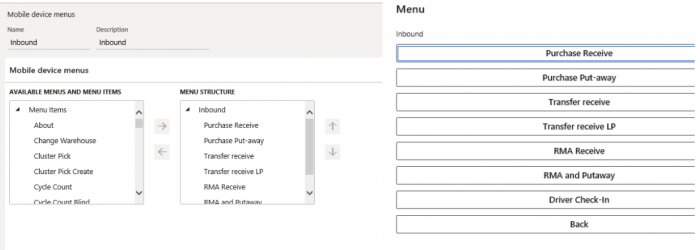
We have to configure Purchase Receive (receipt location) and Purchase Put-away (put location)
Configure Purchase Receive as follows: assign the work template created in step 5C) to it.
Configure Purchase Put-away as follows: set Use existing work to Yes. Assign the Work class ID created in step 5B) to it.
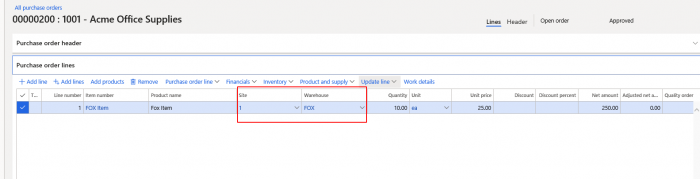
6) Now we are ready to demonstrate how it’s works in Dynamics 365 F&O. First we are going to create a Purchase order. In this order inventory dimensions are site 1 and the new warehouse FOX (see point 4). Item is FOX Item (configuration is explained at point 7).
7A) Related to the configuration of the item(s) (of the the purchase line(s)). We have to check the following points:
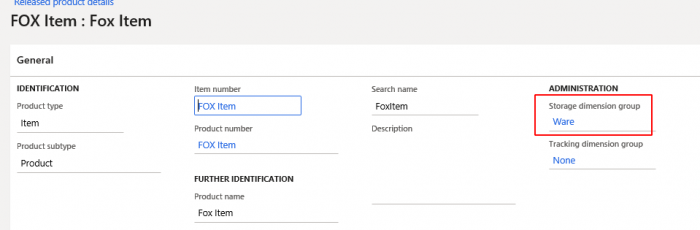
7B) Items Storage dimension group: Property Use warehouse management processes must be Yes.
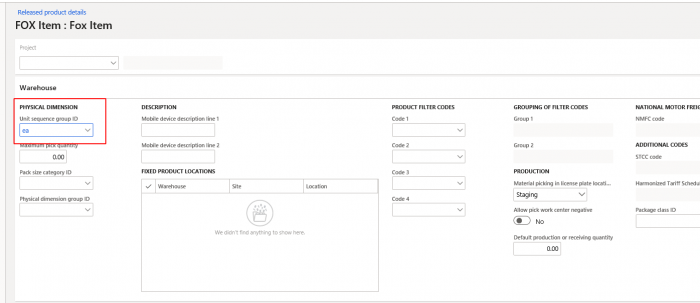
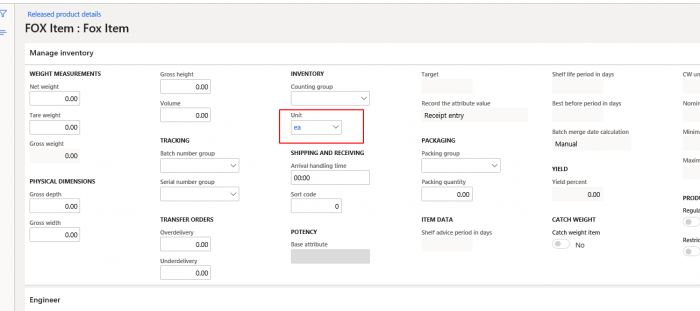
7C) Under fast tab Warehouse of the item card, storage sequence group ID must provided. Unit sequence group ID must be a match with the inventory unit of the item (see fasttab Manage inventory field Unit).
Inventory unit of the item:
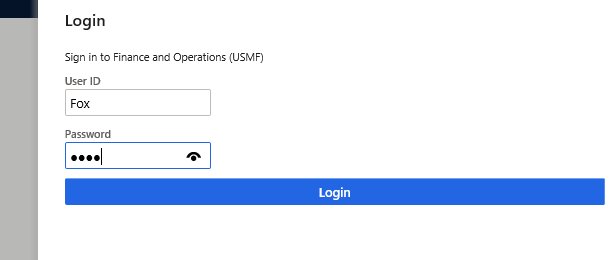
8) To ordering to open a mobile device window in Contoso environment we can use the following link: usnconeboxax1aos.cloudax.dynamics.com/?cmp=USMF&mi=action:whsworkexecute
click Login button. If you have another url, replace the text after mi= with mi=action:whsworkexecute
Mobile device login:
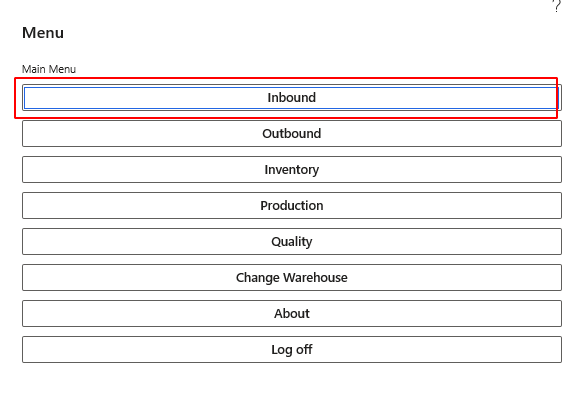
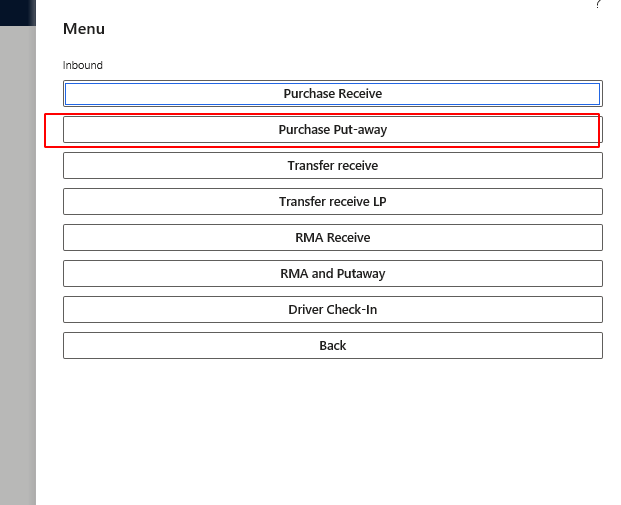
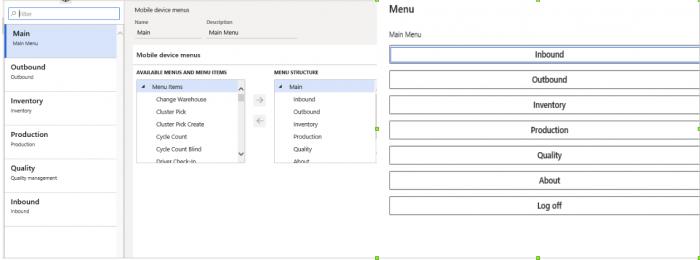
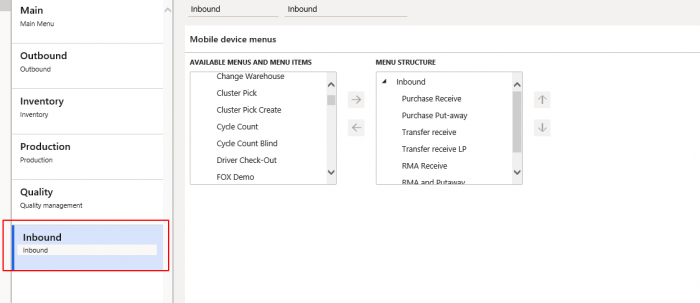
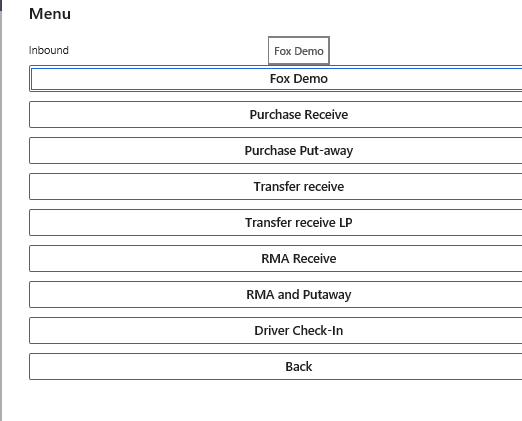
After login we see the main menu menu.Select Inbound:
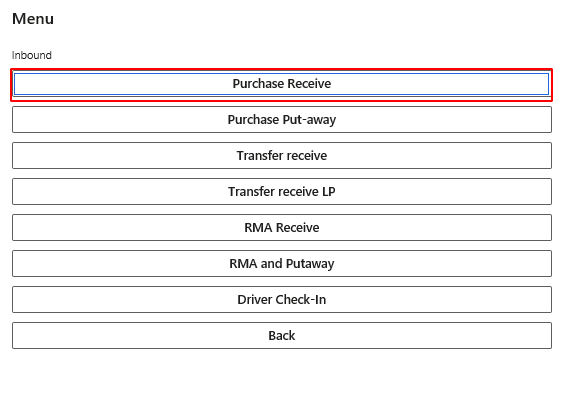
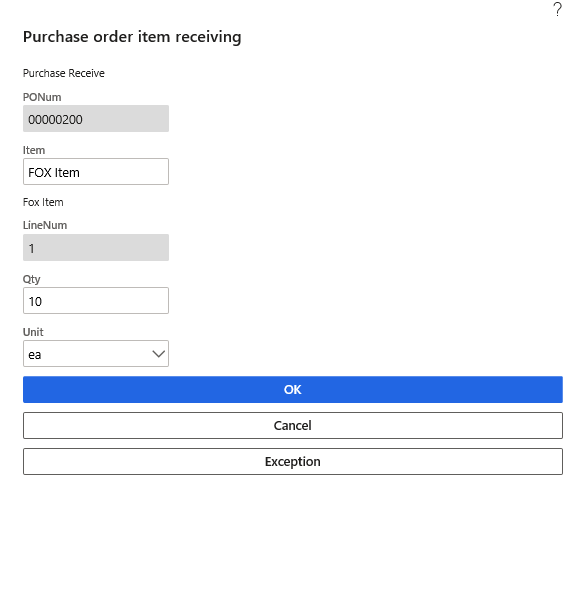
9) First step to receive the goods in the Receipt location (point 4A). Select Purchase Receive and click OK.
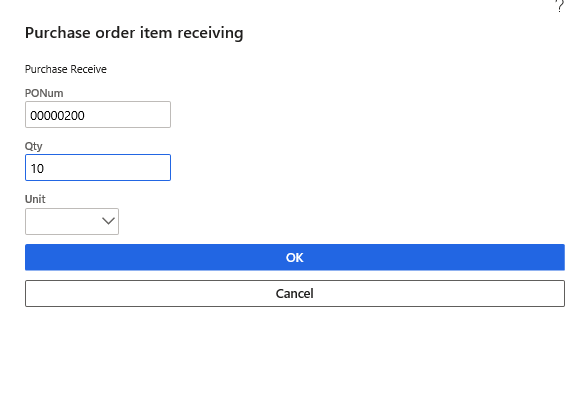
Enter Purchase order number and Item quantity. Click OK.
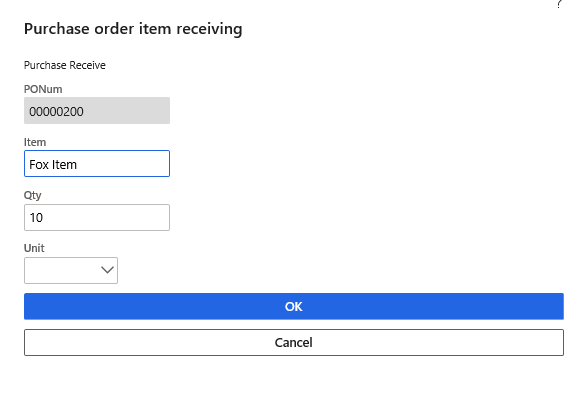
Then insert the item Id and click OK.
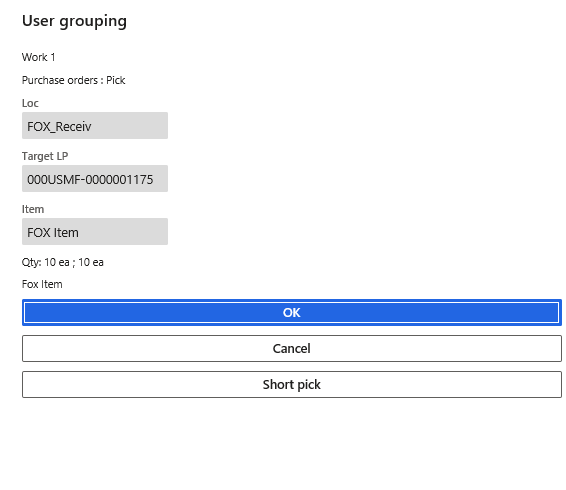
Click OK again:
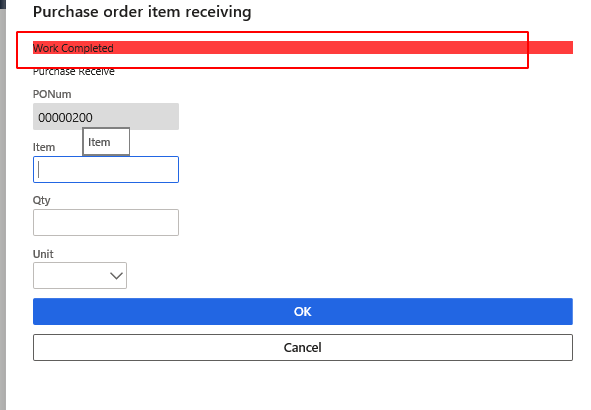
Click OK to complete work.
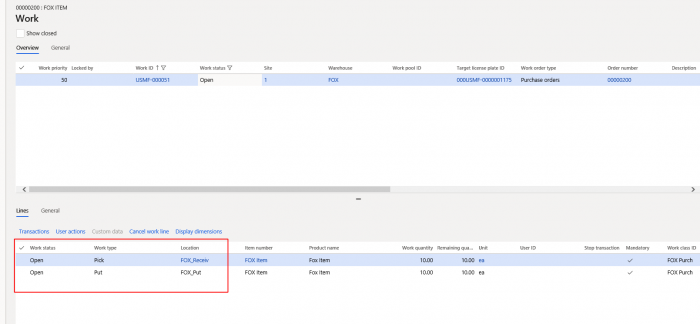
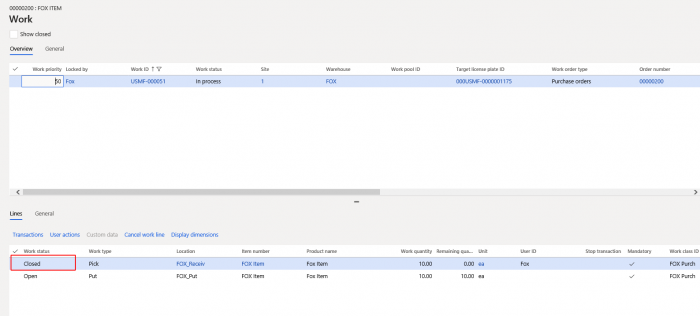
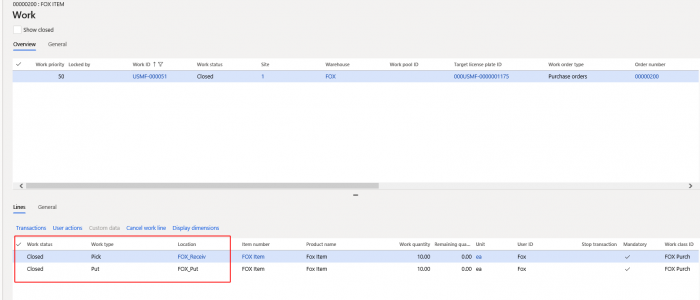
If we now check Work details in the Purchase order:
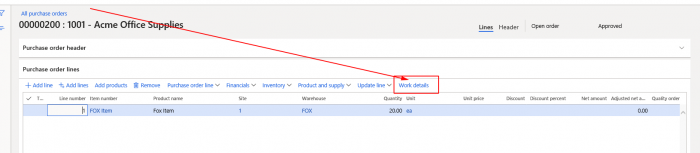
We see in the lines section two lines, one for the Item Receive and another for the Item Pick. Both lines have at this moment Workstatus Open.
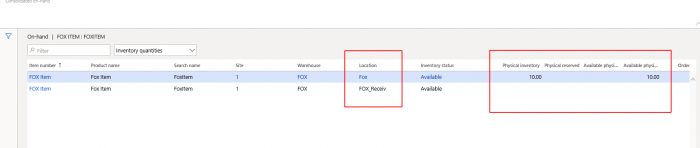
If we check the invent-onhand (Module Product Information Management | Products → Released Products , button On-hand inventory (left top corner):
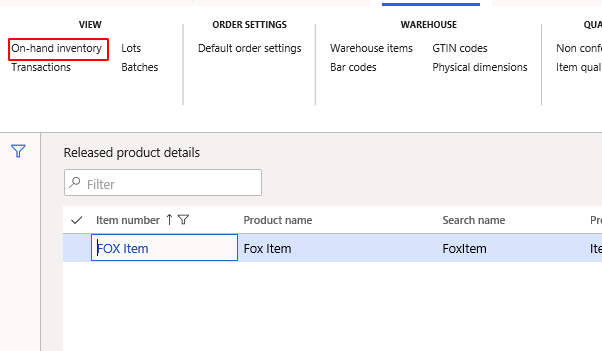
We see that the items are received at the Default receipt location we configured for Warehouse FOX (point 4A).
10) We continue with the Purchase Put-away process, in order to transfer the goods to the Put location.
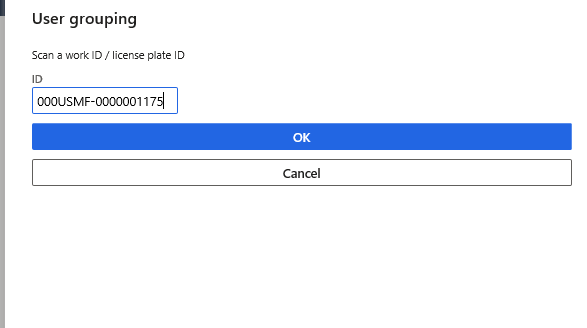
We need to enter License plate ID. You can find License plate ID in the Work details of the Purchase order, at the field Target License Plate ID Click OK
Now we see this menu. System will ask to confirm to put the item into the Pick location Click OK to confirm.
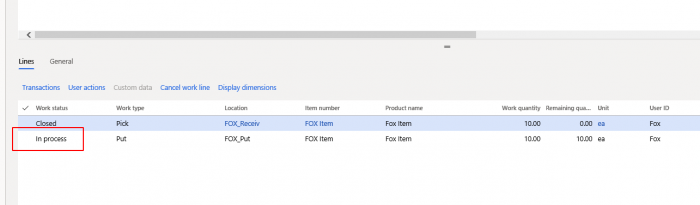
At this stage something changes in the purchase order work details. Our Pick line will be closed:
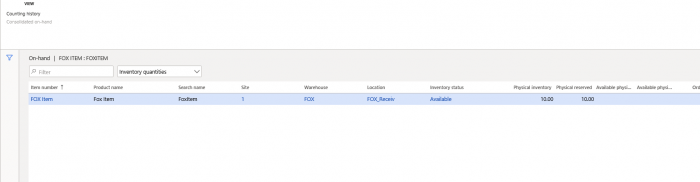
If we check Invent-on hand we see the following. Items are moved from the receipt location, but not in the Put location yet.
In the next step, we need to enter license plate ID and Click the button Done.

At this moment, the Work details Put line’s status will changed to status In process:
In order to complete the transfer (thus complete the work) to the Put location (see step 5B), we need click the OK button:
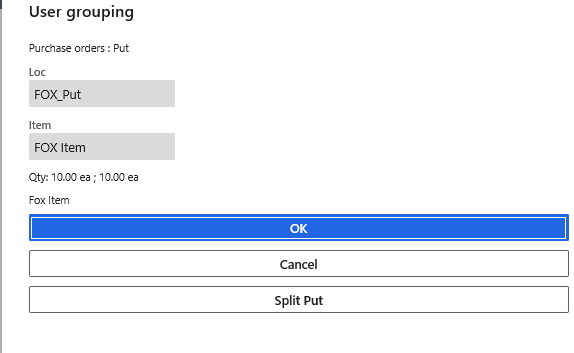
When we see below screen, work is completed:

If we check our work again, we see that Workstatus of both Pick and Put are closed now, which complete the transfer process. Goods are available now in the Put location of Warehouse FOX (Point 5D), from this location they are for example available as stock for the Sales orders.
In Invent on hand we see that the transfer of the goods ato the Put location is completed.

APPENDIX A) Note about the mobile device menu structure.
The set up of the menu structure for the mobile device we find at: Warehouse management | Setup | Mobile device | Mobile device menu
We can see that the menu structure is the same as we can see it at the mobile device.
Main menu:
Inbound menu:
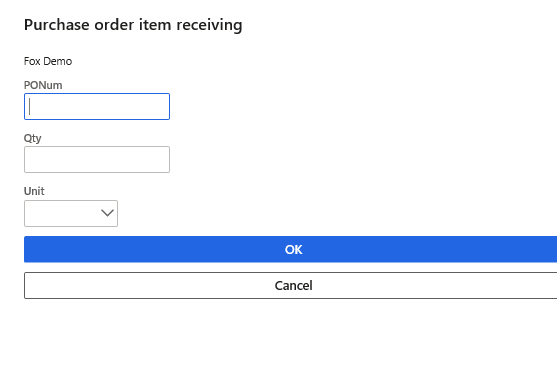
If we click “Purchase order item receiving” button we see by default the following template:
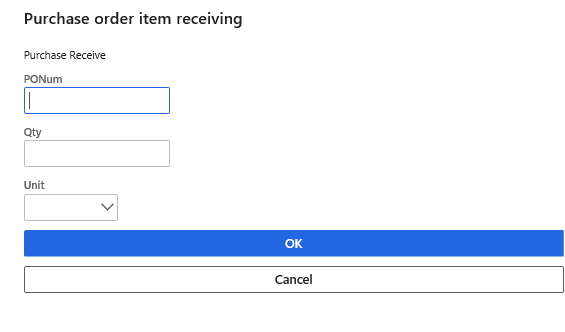
The reason why we see this particular template, we can see at the selected Work creation process for the Mobile device menu item (Path: Warehouse management | Setup | Mobile Device), which in this example selects the template Purchase order item receiving

If we for example change the template for the Work creation process in Movement,
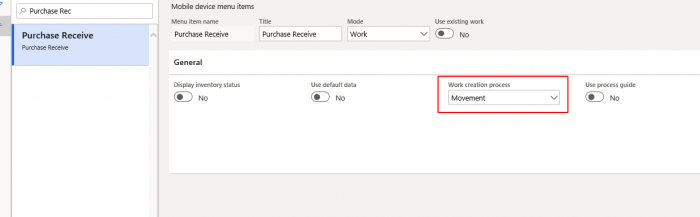
and we click mobile device button “Purchase receive” again, We will see the “Movement” template menu:
Appendix B) Add new item to the mobile device menu.
n this example I add a new item “FOX Demo” in the inbound menu. When user click this button, Purchase item receipt template is shown. Here are the steps:
1) Goto Mobile device menu items (Warehouse management | Setup | Mobile device)
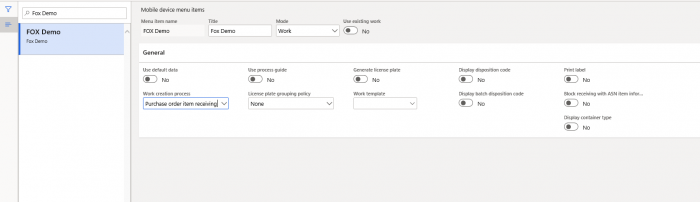
Create a new item, name it for example FOX Demo:
Mode is Work
Work creation process is for example “Purchase order item receiving”.
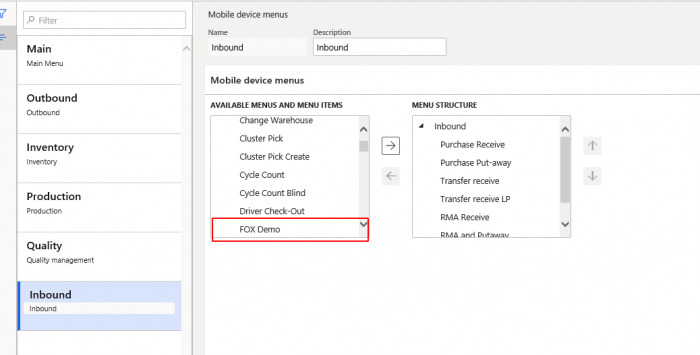
2) Then we place item FOX Demo into the inbound menu. Goto Warehouse management | Setup | Mobile devices and select Mobile device menu. Here we can see our item as Available Menus and Menus items:
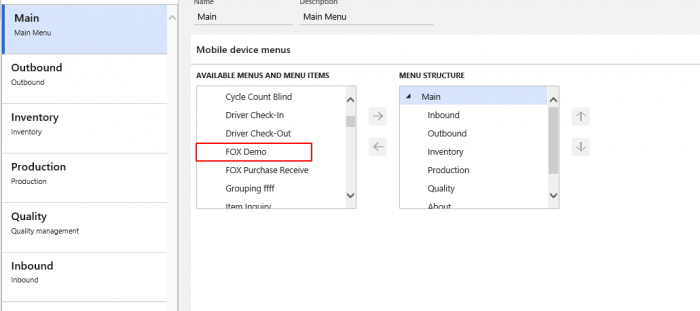
3) Select “Inbound” in the left column.
4) Click “Edit”. Now the Arrow button will be enabled. Select item FOX Demo:
5) Click Arrow and select a position in the Menu Structure.
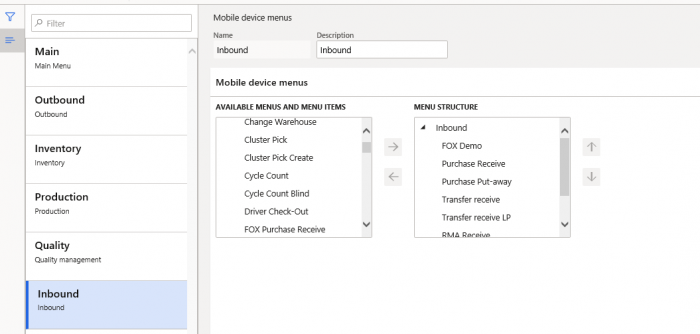
If we open the Mobile device (First log out/ login) we see our new menu:
And if we click the button we see the template for Purchase order item receiving: